Send to Folder Settings
If you add the Send to Folder connector to a workflow, there are two sets of settings that you can figure configure, as shown in the screen capture below.
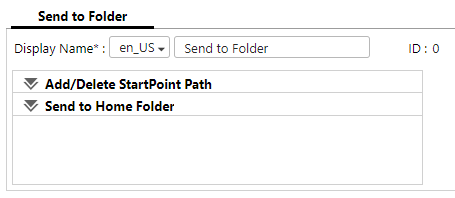
Add/Delete StartPoint Path
Add, Edit, Delete
Use these to add a new root folder, edit an existing root folder, and delete a root folder.
-
Add: Adds a new root folder. The StartPoint Path screen appears.
-
Edit: Changes the setting of the selected root folder. The StartPoint Path screen appears.
-
Delete: Deletes all selected root folders.
Root Folder List
Displays the list of root folders that are registered.
Select the check box of the root folder to be edited or deleted.
To select all root folders, select the check box in the first line or row.
StartPoint Path - General Settings
Display Name
Specify the display name of the folderPath
Enter the path name of the destination folder in the UNC format. You can specify any folder included in the entered path name as the destination.
Example
\\192.168.1.1\shared-folder-name
To specify a local folder as the destination folder, use an absolute path of each platform to enter a local folder. Example: Windows C:\local-folder-name. If your model operates only in Smart Operation Mode and the Send to Folder connector is placed in a workflow whose job processing location is [On Device], specify the path using IP address or FQDN. Path specification using a hostname is not supported.
Click [Test] to check the connection to the folder that has been entered.
In the connection test, authentication is performed using the entered user name, password, and domain, and the authentication method selected in [Authentication Method] is ignored.
Connection test is not available for OIDC login users.
Enable enhanced SMB protocol
Select this check box to switch to Send to Folder, which uses the JCIFS library and Windows API. The function will then support the SMB 3.0 protocol.
For SMB 3.0 + protocol support, .NET Framework 4 or later needs to be installed on server PC where the Send to Folder connector is installed and executed.
To utilize SMB 3.0 + protocol support with PKI encryption enabled and when the job processing location of the workflow is set to [On Server], [Login as System account] must have been selected on the "Service Logon Information" window during RICOH Streamline NX system installation.
Authentication Method
Specify the authentication method to be used.
The system uses the information specified here when accessing the destination folder and saving the scanned document.
-
Proxy User: The system uses the login information specified in [User Name], [Password], and [Domain] for authentication.
-
Login User: The login information of the workflow is used for authentication.
The number of characters and character types that can be entered for [User Name] and [Password] vary depending on the specifications of the delivery destination server.
To browse the address book using the Management Console when selecting [Login User], enter [User Name] and [Password].
In the Send to Home Folder function, the system uses the login information of the workflow to distribute the scanned documents to the folder of the logged-in user even if [Proxy User] is selected.
Authentication Profile
Select an authentication profile. When an authentication profile is selected, the user must enter the password to use Send to Folder on the operation screen of the device.
This setting is not available when [Job Processing Location] is set to [On Device] and the [Enable enhanced SMB protocol] check box is selected.
Access to Subfolder
Select the [Enable Subfolder Browsing] check box to allow the user to browse for a folder and select the folder as the destination.
Create a Subfolder
Select the [Enable Subfolder Delivery] check box to create a subfolder under the destination folder automatically.
When the check box is cleared, the scanned documents are directly distributed under the specified destination folder.
When you select the [Enable Subfolder Delivery] check box, specify the following:
-
Folder Naming Rules: Specify the subfolder name. A folder is created under the subfolder when you include a separator in the name. For example, enter "abc\xyz" to create the folder "abc" under the root folder, and folder "xyz" under that folder. The scanned documents are saved in "xyz".
-
Use one of the following methods to specify the name of the subfolder to be created:
-
Enter the folder name manually.
-
From the drop-down list, select the metadata element to be used as the folder name.
-
-
Add Suffix to Folder Name: A suffix is added to the subfolder name when another subfolder with the same name already exists. A suffix is a number between 1 and 9999 that increases by 1. When the suffix exceeds 9999, an error occurs and delivery fails. If a folder with the same name already exists while [Add Suffix to Folder Name] is not selected, the scanned document is saved in the existing folder. For details about the procedure to specify the folder name, refer to Automatic File or Folder Naming.
File Naming Rules
Specify the name of the file to be saved in the destination folder. Use either of the following methods to specify the file name:
-
Enter the file name manually.
-
From the drop-down list, select the metadata element to be used as the file name.
- For details about the procedure to specify the file name, refer to Automatic File or Folder Naming.
- If a file with the same name already exists, a suffix is added to the file name. A suffix is a number between 1 and 9999 that increases by 1. When the suffix exceeds 9999, an error occurs and delivery fails.
Create URL
Select the [Create URL Using Base URL] check box to create an URL that indicates the location to store the scanned file.
The metadata of the URL is added to the "resultURL" metadata element.
Example
StartPoint Path: \\192.168.1.1\targetPath
Destination folder: \\192.168.1.1\targetPath\myfolder File name: doc.tif
Base URL: http://samplemyurl.com/path1
Resulting URL: http://samplemyurl.com/path1/myfolder/doc.tif
If you select the [Enable Subfolder Delivery] check box, the URL of the created subfolder is added to the "resultURL" metadata element. If you select the [Enable Subfolder Delivery] check box, all sections (files) in the scanned document are added to the "resultURL" metadata element.
When this check box is cleared, a URL that indicates the location where the scanned document is stored using the StartPoint Path.
Example
StartPoint Path: \\192.168.1.1\targetPath Destination folder: \\192.168.1.1\targetPath
\myfolder
File name: doc.tif
Resulting URL: \\192.168.1.1\targetPath\myfolder\doc.tif
Character Encoding for File (Folder) Name
Select a character code from the drop-down list. The following character codes are supported:
-
UTF-8
-
Windows Shift-JIS (Only in Japan)
-
JIS (Only in Japan)
-
Latin-1
- [JIS] is only displayed for workflows processing jobs on a server.
- If the file server at the delivery destination does not support the specified character code, either delivery fails or a file (folder) is created with corrupt characters.
Check Writable Access Rights
Select the [Enable when selecting destinations on the device panel] check box to check whether the user has the permission to access the destination on the operation screen of the device when distributing a document.
Send to Home Folder
Select the [Enable Send to Home Folder] check box to allow a user to distribute a scanned document to the user's home folder using the user's login information.
The string "Send to Home Folder" is automatically added to the default destination list if the system has succeeded in obtaining the user's home folder information from the authentication server.
After a home folder is configured for each authentication method, all home folders are added to Selected Destinations on the device. Select Proxy User in the authentication method to send the document as a different user.
A distribution error occurs when the user does not have the write access permission to the home folder.
The fields in the Send to Home Folder configuration are the same as those in the StartPoint Path. Refer to StartPoint Path - General Settings for field details.